Hilfiger CCR
 Menu Homebuilders


Building your own rebreather, is a dream of many boys. And girls. Being a professional diver is another dream. Going to the university in another country too. Building a closed circuit rebreather would be even better. Designing your own electronics in a single rebreather project has to be about the summit of all goals. Still Fernando Landeta would like to be trained by one of the gurus.... Well if I was Tom or Kevin or.... (did he mean tom R or tom M or Kevin G or Kevin J? ;)) ) I would invite Fernando for another talk...... (after he finished his study)

Well guys, here is a very nice story of someone traveling from one side of the earth to the other. Starts his study and a job. With that money he decide to build himself a CCR....

Goooooooooooooooooooooooooooooooooooooooooooooooooooooooooooood.... and very well done Fernando!

 
FERNANDO LANDETA
24 july 2005

fernando@pclab. Ifg.uni-kiel.de

How  I came up with this)

 It all started when  I arrived to Germany for a Msc course and a old friend asked me to look for a "Dolphin to dive up to 80 meters" for him.  In the process of looking for such a thing,  I eventually start finding many interesting web sites.

 So, in the last half a year,  I became a "cyber-diver", especially in the winter, where the real diving opportunities were not as often as i was used to in my land.

 I write "ciber-diver" not completely convinced, given the low popularity of these group of people by some others, mostly in the RB list... :-)  , although i can say in my defence that i have been diving since kid -in the cold waters of the Chilean Patagonia- to later became a commercial diver, activity that mostly paid my studies of Civil Engineering and later gave me the opportunity and financial support to came here.

 Thanks to this cyber-time and the low sun exposures, i learned quite a bit of  RB theory and, ultimately, decided that investing time in building my own machine would be a great adventure and anyway, i had the time with me (not anymore).  What i didn't have in excess was money. I found a side job, both to finance my project and try to learn the language since i worked in English here. (that has been pretty much one of the hardest things in this process. Try to get myself understand in a machinery shop or an electronic shop when the people there didn't speak English was at the beggining a nightmare, although i have to say that all of them were very friendly when they saw me trying so bad to speak German with my dictionary in hand. I think that was a funny moment of the day for them.

 In the first time, i remember saying to myself; "This looks so simple, what’s the big deal in it? I’ll be diving my own one RB in 2 months...”.  After two months i hadn’t been able even to decide what type of machine i wanted. i liked very much the voting logic electronics designed by Will Smithers and decided to go directly trough the most complicated path. I was going to build a ECCR from scratch!


I worked here at Uni-Kiel mainly in wave modelling and have spent a time programming; i thought that writing a program for a pic controller shouldn’t be much of a problem compared with some other things to care about. In fact, it was, just like many other problems just waiting for me along the way. Many of them were pretty simple (at the end, logically). 

Some others were not. One big problem that i had was the fact that i have never had a CCR before in my hands, except mine. The closest thing I had seen was a Dolphin and a military version of a CCR from Dräger. Another issue was the that the time to build was severely reduced due to my normal and side work as a waiter) and many field trips and measuring campaigns for my studies. 

Against all of these things, i was very happy with myself when i tested the machine last week in the swimming pool. I should also say that I have no formal training at all with rebreathers, and for the moment that is out of my reach due to financial and timing issues, so I guess I am at the ground floor of a very very long self-learning process now.


The test finished after almost 2 hours underwater with a still sealed, almost dry, fully operating rebreather, and myself alive, which made me feel for a moment proud of myself. 

So, enough, going now to the specs of the machine (no name yet, gladly accepts ideas):

Lungs:

Over the shoulder design.

Made from plastic normally used against humidity in house isolation. Three times hot welded in the sides. Volume app:  5 lt. each.

Outer bags made from material used to make sails. Couldn’t find cordura here. They are too short, I'll enlarge them in the next edition. I sewed them in such a way that when inflated, they take the curve of between the chest and the shoulders. Took time to figure that out from nothing....

 The inhale CL has a AP dry suit inflation valve, whereas the exhale CL has a Northern Diver dry suit inflation valve, which makes mistakes in injection very difficult. Also, there is a op valve used in Viking suits at the bottom of the exhalation CL to clear excess water.


Scrubber:

I decided for an axial design due to my financial limitations in workshops. An outer case isolates the scrubber. The capacity of absorbent can be varied with the use of different inner case lengths, I have at the moment two sizes: 1,5 and 2,5 kg of absorbent. The highest weight I can possibly carry is ca. 3.3kg. I think for my early requirement that is more than enough. 

There are two sealing o-rings between the outer case and the inner case. Both work good avoiding the bypass the scrubber. The inner caps are joined by a long screw, thus screwing against each other, which makes the packing process quite fast and safe in terms of channelling.   

I decided not to perforate the complete inner lid, so when water eventually gets there, it can be retained there longer and/or trapped by absorbent pads. 

The outer case with its lids and inner lids are from PVC-U. The inner sleeve is made of transparent acrylic. Naturally there are filters and SS wire net at both ends.


Hoses and DSV:

After taking my drawings to different machine shops and see what they would cost, i decided for the simplest thing: Draeger Ray hoses and mouthpiece.


T pieces and connectors: 

From PVC-U bought in a plumbing section of a big shop here. (Richter-Kiel). I made some o ring routings with a Dremel machine, and unbelievable it worked. not at the first time, of course, but it worked. I'm buying a lathe as soon as I can.


Backplate and Wing:

I installed everything over a homemade SS backplate and in between, I mounted an experimental wing that I made also from scratch with spare parts of an old bc. I had nothing else than an old Tommy Hilfiger bag the night I got inspired to sew, so I torn apart the bag and used it to create the protection bag of the wing. At the end it didn’t look that bad and it has the colors of the Chilean flag... :-)

My intention was to put a considerable more volume in the lower area where the regs are. It worked as expected giving the rig a naturally horizontal trim position. I should also say that I managed  without expecting it, to make the rig neutral in water. That was also nice.


Solenoid and cells:

12V 4Watt solenoid valve. normally closed, naturally.

Could not find a smaller one. responsible for the high amount of space used by batteries.

3 PSR-11-39-MD  o2 cells. 8.5-13.5mV on air


Bottles: 

I choose 2x5lt bottles used normally in emergency sets in Germany. Both were oxygen bottles, wp: 200bar. as soon as they got to my hands I inspected and cleaned them for what I need them.

The reason for 5lt is that I have run a number of profiles in a couple of deco programs that I have, plus mine (I have compiled a simple Trimix deco program that is waiting to improve) and all of them bring me back to 6m alive in a bailout situation (of course I have considered in the gas consumptions the amount required for suit inflation. In my setting, the wing is inflated with o2.


So, until I get into real serious dives, I don’t urgently need to carry a bailout stage. Unless, of course,  I get recommendations from people with bad experiences in the same matter.


Controller:
At the beginning i though about a small handset and a separated power and calibration housing. But as always in this project, i was required to minimize costs, so i designed a slightly bigger handset housing and forced myself to make all fit in that quite reduced space. That process drove me completely nuts until the point i was at the very edge to throw the whole stuff from my second floor in my house several times. And myself after….

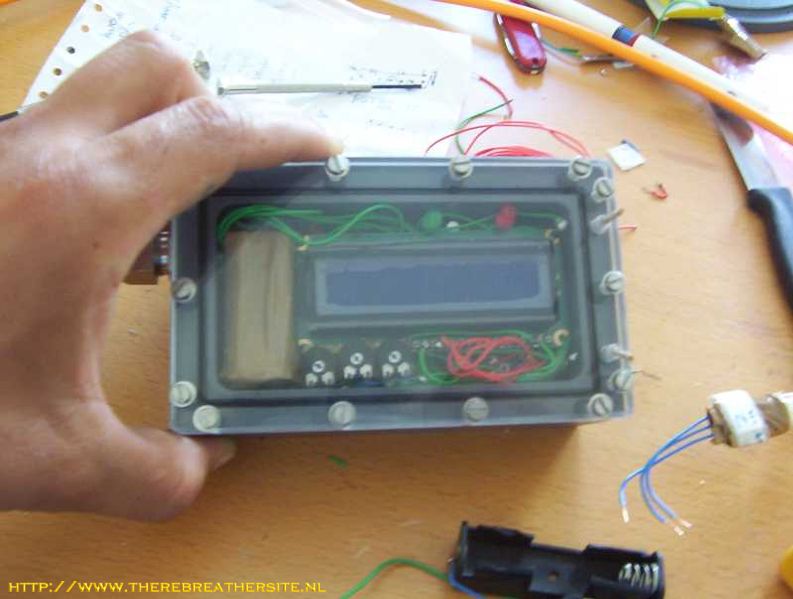
 In the housing are located:
- 2 magnetic switches

- 1 PIC16f microcontroller

- 1 LM324

- 1 DS1307 clock

- 1 transistor for high current switching

- 1 pack of 8 AAA NiMh 900mAh

-  1 small lithium 3v backup battery for the clock

- 1 very low power consumption (15mA) 16x2 LDC with white char and blue background

- Resistances, capacitances and pots for calibration, and for contrast of LCD


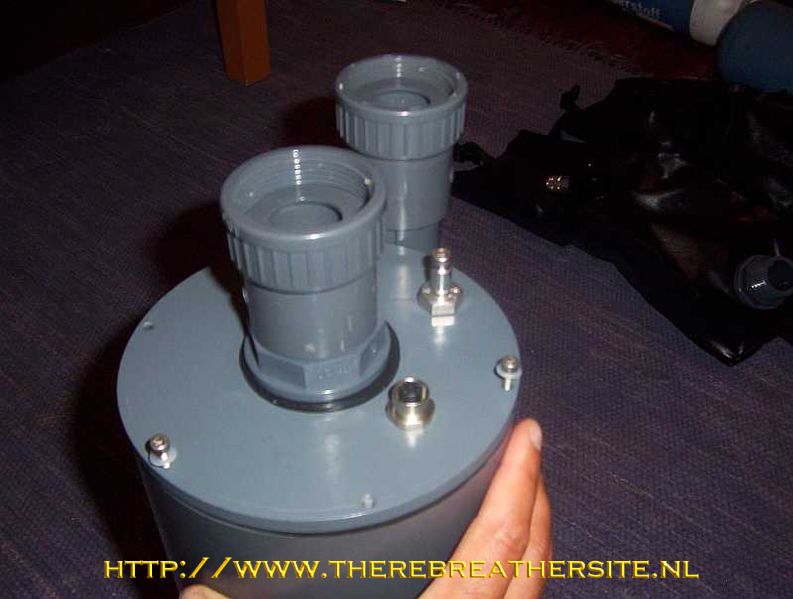
The controller glands and cable are from Dev-Pein, a German company that sells very nice things. i decided for a fixed end in the handset side and a removable one to the lid for pressure related issues. The fixed is rated to 10 bar and the removable to 8 bar.


The controller does:

before dive mode displays:

- date and time

- time of the last dive (for scrubber logging info or anything else)

- readings of the cells to check for calibration needs.

- waits and prompts for begin of the dive.

 in dive mode:

- ppo2 of all the three cells

- dive time

- ppo2 average value

- status of each cell

- L or H or M depending of the setpoint mode

- Injection character when injection takes place

- alarm characters


it has high and low setpoint (currently set up at 0.5 and 1.3 bar ppo2) and manual

plus 2 leds for alarms:

- low/high ppo2

- individual cell out of range


-it counts OTU' s, but I'm having some problems with the CNS%, so i decided not to show them until i am sure of both. 

There is a voting logic "algorithm" in it, set up at 20% difference between cells.

I don’t know whether that is too much or too few. When there is a higher variation of an individual cell, the average is taken from the other 2, of course and an alarm is displayed. 

2 reed switches control everything and actually, only one is needed most of the time. the other was thought for a future deco program for the handset, and for now, it  is just a hard reset button, in case i require that.  

I can reprogram the pic as many times as I want,  not needing to extract the pic nor anything. So when I get inspired to write a better program it won’t be difficult.


It must have been big fun building that unit!! Fernando, thanks for your contribution!
 

Top of page

Please sign my Guestbook